Showing posts with label DIY. Show all posts

Thursday, July 24, 2014

Wardrobe Refashion: Summer Skirt

Once again I have delved into my own closet to spruce up my wardrobe. Today it is a dress I've had for years and seldom wear. 

It's super cute but halter and me don't get along. Whenever I wore this dress I wore it with a thin tshirt underneath (so I could wear a real bra!)  I figured I'd get more use out of it as a skirt.

I took off the halter top and re-hemmed the edge. I took the halter straps and added them to each side seam so I get a bow in the back. It's high waisted, a bit retro and super wearable! I've already worn it more than I ever did as a dress. 

*my dress form is quite a bit smaller than me so it looks a bit gappy from the back.

I've pulled a few other items from my closet that are going to get a refresher. In particular I  looking to make some travel friendly pieces for my big trip to Vanuatu in a couple months. I've got loads of travel craft ideas saved so whether you are traveling abroad or road tripping to Grandma's I'll have some projects coming up that might float your boat! 

Thursday, July 10, 2014

2 beauty DIYs: Eye Makeup remover & Dry Shampoo

I pin, bookmark, jot down, and overall hoard ideas for all sorts of projects. Once in awhile you gotta just get them made! I finally got around to making a couple of super simple beauty DIYs. 

First up: Dry Shampoo

I've really changed up my hair care routine and I don't wash my hair very often anymore. Dry shampoo is my new best friend. While I like a few store bought brands, the plethora of online tutorials to make your own was just too tempting to pass up. 

I went with a super easy combo to try. 

DIY dry shampoo:
- 1/4 cup cornstarch
- 1/4 cup baking soda
- 5-10 drops lavender essential oil (or your fav)

Mix up the ingredients in a small bowl and then fill whatever container you wish! I used this super cute vintage powder box, but any small jar would work. Apply it with a makeup brush at the roots, let sit and brush out. For darker hair you can add cocoa powder to the mix.

It smells great and works really well.

Next up: eye makeup remover

After being not so impressed with some store bought I thought I should give this a shot. I've seen many different versions out there so pick one that works for you. The one I chose is only 3 ingredients.
DIY Eye makeup remover
- 2 oz water
- 1tsp tear free baby shampoo
- 10ish drops baby oil

I used my empty bottle of eye makeup remover, with my handy funnel. Mixed up ingredients in a measuring cup and poured it on in. Done! If you go this route be sure to shake up your solution when you use it. 

So far I would say it works about as well as the store brand stuff I was buying. I am also now using the leftover baby oil to shave with- a little tricky but my legs feel super soft! And I have used some of the baby shampoo to wash my hair brush and combs. 

Any favorite diy beauty tricks you have tried? 

RETRO-active blogging: MN Comic Con Edition

Yeah this was like 2 months ago but I'm getting to it! The first weekend in May brought Wizard World comic con to MN. My sister really wanted to go so we bought ourselves one-day tickets. We didn't have grand plans for outfits but a recent binge watching of 'heroes of cosplay' on syfy really made me want to do at least a little something! So I tried to think of easy-ish costumes that would be quick, cost efficient and fun to wear. We were treating this con as our warm-up/starter con as neither of us had ever been to one before. 

After some late night Pinterest searching I decided to go with a cute, vintage, lady captain America.

Here is the dress I started with. I already owned it! I bought it months ago on sale at target and it was too big. I ended up buying another one in my size and forgetting to take this one back. Now, long after the return policy has ran out, this dress will serve a purpose! 


Along with the dress the pile of fabric and trim above came right from my craft stash. Yes that is super awesome Captain America comic book fabric that I bought probably about 2 years ago for a project that did not happen. 

So far cost: $0

This is what I bought for the costume. Red opaque tights and a red and white striped infinity scarf. I could have gone to the fabric store but I thought the scarf would work just as well and that saved me another trip. 

Scarf and tights: $12.50


Here is how I made my star. I centered it by eyeballing it with the center of the Peter Pan collar and used a cookie cutter for the shape. I taped it off and used some metallic fabric paint to fill in. I didn't have any craft brushes that weren't super tiny so I improvised and used a makeup sponge to dab the paint on. I put a magazine between the two layers of the dress and was generous with the paint.

Ta-Da! With the infinity scarf I cut it half and then in half lengthwise. I sewed the two long pieces together, folded the now super long piece in half width wise and made a tube. I turned it right side out and tied it around my waist making a generous bow in the back. I cut off the excess on the ends and sewed them shut. 

The sash now gives the too big dress some bombshell shape. 

With my comic fabric and some webbing I had on hand I made this super awesome bag. (I need to find the tutorial I used and link it!)

On the day of I added the red tights, some blue flats, and some vintage inspired hair and makeup to make this outfit cute, comfy, and just the right amount of fun! 

I loved this outfit. And I think it gave me the confidence to go a little bigger next time around! It was a strange experience to have people stop you and ask if they could take your picture. It only happened a few times but I admit it kinda made me feel like a movie star. Everyone was so nice, there were a ton of other really cool costumes and my sister and I had a great time! 

Any other people new to the cosplay thing? 

Thursday, May 29, 2014

Dollar store bathroom update

My friend Krista is set to move into our house any day now and while I am excited to have her here I am less excited about sharing a bathroom again. Yes that probably makes me a horrible person but the last two years have spoiled me! So to reclaim some space for her things I took a trip to the dollar store. Before adding more storage space I took all of my stuff out and deep cleaned the whole bathroom. 

I had two main goals: make more storage space on my shelves and make all my 'counter stuff' fit on one side of the counter. 

For the shelving unit I bought 6 plastic baskets from the dollar store and a pack of zip ties.

They were easy to add to the white rack and they will be easy to remove later down the line.

Next I saw a lot of inspiration on Pinterest to make a tiered bathroom storage unit. I love my vintage mirrored tray, but I thought something with height would make more sense in the space. I have seen several versions with pretty vintage plates/dishes but I decided to stick with the dollar store and combined a pretty pink oval serving dish and chip and dip with a plain plastic wineglass. This way everything is not too sentimental if it gets broken.

Just a little glue and bam! instant storage space. 
I think it goes rather nicely with my vintage pink vanity boxed from Great Grandma Ruby! 

With these two simple projects I only spent $10 and almost doubled my space. That combined with me just cleaning out some old stuff there should be plenty of room for two girls to share this bathroom!

Stay crafty!

Tuesday, May 27, 2014

Wardrobe refashion: seam ripper edition

I have really been trying to buy less stuff, it's not really working but I am trying. I have also started a bit of wardrobe refashion to spruce up my closet. I have a bad habit of buying dresses on clearance, usually at target. Sometimes when they are a great deal I buy all the colors of one dress.  Enter this pair of floral dresses I am in love with.
Super cute right? Well as you can see on the gray dress I have already altered it into a skirt. As cute as the dress is on my carpet, I have a few more curves and the top of this dress always ended up boxy and unflattering. I have been lusting after all the cute skirts on Pinterest and with only a seam ripper I have converted these dresses into cute ultra-wearable skirts. These were the dresses I would try on and then take off to put on something different. Now the skirt can be a bit longer (the dress was pretty short) and I am already picturing pairing this with my go-to hoodie. Mmmmhmmm.
My roommate suggested that I now also have a crop top. Haha. NO. But maybe I can come up with some way to use the fabric. 
Skirts! Love. 

I worked on this project while watching 'heroes of cosplay' on syfy. Anyone watch it? I'm kind of hooked. 


Friday, April 5, 2013

Movie inspired craft: UP

Beware! Extreme cheesiness ahead!

The crafting bug has been gnawing at me lately and lots of my ideas have been revolving around my sweetie, who will be leaving for the peace corps this summer. He doesn't even know where he is ending up yet but he has asked if I will come and visit him. I had the idea to make a money jar that said "Plane ticket to...?" but then I thought of a better idea- UP.

We both love the movie Up so I decided that I would make a Paradise Falls money jar.

I already had a mason jar I wanted to use and I had found a map-patterned piece of scrapbook paper that I wanted to use for the lid and label. So it is not an exact match but this is one of those times where it is really the thought that counts : )


Supplies: 
-Mason jar with lid (do not need the solid center part)
-lightweight cardboard
-paper for lid cover and label (as fancy or simple as you wish)
-mod podge
-marker
-Scissors

Optional: 
-fancy scrapbook scissors for the label
-exacto knife to make the lid cover cutting easier
      

 1. Trace the top of your jar onto both the cardboard and paper
 2. Cut a money slot for the lid cover
 3. Glue cardboard and paper together

 4. Cut a label for your jar. Write your message and mod podge it on (I tried to copy the lettering of 'Paradise Falls' from the label in the movie)
 5. Fill with money! (I cheated and transferred the contents of my several 'coin dishes' that I have around)

I sent the last picture to my sweetie who liked it so much I am making another one for him.

This would also make a super cute gift bag- complete it with a copy of the movie Up, add an Ellie badge and tie a balloon to the bag.


Saturday, December 8, 2012

Christmas Candy: DIY Outdoor Decor

I have had the idea in my head of making my house look like a giant Gingerbread house for quite awhile. I am finally going to start making that happen! I made some cute Christmas candy lollipops for the front yard for super cheap.

I started with a broken drying rack that I had lying around (I never throw anything away!)

 First I took all the white dowels off of the rack.
 I bought some styrofoam plates for the candy part. I needed something that would hold up well in weather. To make it look a little more candy-like and less plate-like I trimmed off the outer edge of the plates.
 ....And I kept the scraps to make some other project!
 Using craft paint from my stash I whipped up some lollipops. After experimenting with a few different designs I was most happy with the 'traditional' swirl design so I made more of those. This would be fun to do with kids- they could make whatever candies they wanted!
 Even though you will mostly only see one side of these I made each one so that both sides were decorated. After the paint was dry I took each pair of plates and sandwiched them around the dowels and glued them together. I finished them By wrapping some clear plastic bags on top and tying with some ribbon.
Thankfully the ground hasn't gotten so solid that I could fairly easily just shove these in the ground. It will look a bit more Christmasy once there is some snow on the ground! It will probably take me a couple of years to get enough projects done to make it look properly 'gingerbread' house but I am up for the challenge.

More outdoor decor to come!

Happy Christmas Crafting!

Friday, November 9, 2012

Is it over?!

Not only is October (and Halloween) over we already solidly in November! Where has the time gone? I am going to say that I have been having so much fun that the time has just flown by...Mostly true! I did get a few Halloween projects done this year, including two costumes.

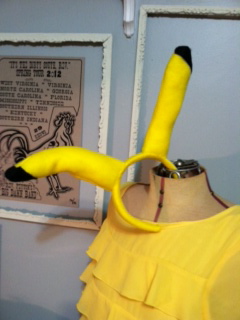
One was for my sister. She wanted a pikachu costume. I forbade her from buying one!

We headed to the thrift store and found an adorable yellow dress. I made a tail and some stripes and a set of ears.

 For the ears I covered a headband and stuffed the ears with polyfil and some lightweight wire to give them a bit of bend.
The tail is a styrofoam base covered in fabric (all sewing- no glue!) The base of the tail is sewn to the dress and then a small loop of string was attached to the top of the tail and then looped onto the button at the top back of the dress to make the tail stand up.

The stripes are dark brown felt sewn to the dress. The upper stripe covered some of the zipper so it is only half sewn on and the other half I attached 3 velcro bits so you can still unzip the dress.

Some major blush on the cheeks and she was the cutest pokemon at the party. (Ok she was the ONLY pokemon at the party...but still!)


I also made a squirrel costume for my girl Squirrely Q. I had her buy a hoodie that she liked and I added ears and a tail. She loves it so much she still wears it around. I didn't get a picture of it but I also bought a small glitter acorn from the craft store and added a loop of fabric to it so she could wear it around her wrist or safety pin it to herself so she wouldn't lose it!

Hope everyone had a safe and happy Halloween and now onto the holiday season! WOOO HOOOO!


Tuesday, October 9, 2012

Harvest Moon Festival: Fall Floral Crown DIY

I helped out at the History Center's Harvest Moon Festival this weekend and we were encouraged to dress up so of course I jumped on it! I originally wanted to be sort of a fall/fairy queen type but I started to run out of time to get together an elaborate costume. This is a lesson that I have learned over and over and I really need to take it to heart: USE WHAT YOU HAVE. Sometimes I get so obsessesed with creating a new costume that I forget that I already probably have stuff in my closet and craft room that would work.  I did really want to make a fall floral crown  after being inspired by all the tutorials and things I have recently seen.


A trip to Michaels provided some lovely fake fall items on sale I got this whole bunch for less than $5! My job at the festival was helping out at the pumpking painting station so I wanted to make sure I had at least one pumpkin involved.

First: I simply unwrapped the small circle of leaves and beads. I was hoping to use this as a base. Lo and Behold! It was a perfect shape and size. I would probably wear this by itself it is so pretty.
2nd: I just started pulling apart elements from my other 'sprigs' and winding and twisting them into the base crown. In a couple spots I used brown twist ties to secure the items together. The whole project took less than 10 minutes! And since there was no glue involved I can take this apart to either source for other craft projects or to mix up this look. Win! Mine sat on my head just like a head band but if you added ribbon to each end you could tie it and adjust the side a bit for the kids in your life! (Just make sure they are old enough not to try and eat it- there are some small bits!)
The rest of my costume ended up being a combination of a few different costumes I had and some regular clothes. It was supposed to be a bit like a victorian looking witch. One girl described me as a 'Fall queen' and said that I was 'very pretty and you have the perfect color hair." She might have been my favorite! It was a little chilly and of course I forgot my camera but here are the little pumpkins I painted!
Happy Haunting!!!

Sunday, August 5, 2012

You get the picture

Well I haven't been quilting as much as I like but I have been finishing up quite a few small sewing projects around the house. This project was inspired by my surroundings. I love having a lot of pictures up on my walls but I don't like putting holes in my walls. I have used 3m strips/ hooks for years but they fall down a lot and can get quite spendy. I have this shelf going around the top of my wall already I thought if I could figure out a way to attach the pictures to the shelf then I wouldn't have them falling down all the time and I could put more pictures up and make more space on my shelf for all of my other cool stuff.

 Here is the before. I have about 12 pictures on the wall (plus a bare hook and some other random stuff).


 I sewed two strips of fabric together. One was to tie around the shelf and the other one was to attach the picture frames to. I sewed lengths of scrap fabric and ribbon to the 'picture strips' to attach the pictures- making them easy to change out.


Finished! Now I have 21 pictures on my wall that are not going to fall down. If I were to do this project again (or tweak the one I have) I would have made the picture strips come down a bit farther to meet up with the dresser more. But I was just using scraps from my bin- a quick no cost project that serves a great purpose! Win!

Now on to those other projects I have started...

Monday, July 30, 2012

Currently Obsessed With: Quilting

As busy as things are I always find time to daydream about more stuff I could be doing. And quite honestly if I spent a little less time daydreaming about it and more time DOING stuff then maybe it would happen.

My current sewing project is another t-shirt quilt for my friend. She gave me all the shirts MONTHS ago and I have only made significant progress on it in the last week or so. (Pictures to come when completed). Partially I have problems organizing my craft time but then I also feel like I shouldn't start new projects when I have some in the works.

Thankfully my latest craft obsession is quilting and I hope that this will motivate me to get this quilt done and to start some new fun projects at the same time.

It all started a couple of weeks ago when I visited my Grandmother Marilyn. Her town was hosting it's little 'festival days' and one of the events was a quilt show and 'bed turning'. I had been to the quilt show years ago and decided it was time that I went again. My Grandma, Aunt, Mom, and I piled into the car and drove the mile or so into town. The quilt show was probably small by most standards but the wide variety of quilts was quite stunning.

The bed turning was the coolest part. They had a bed layered with 30 or so quilts on top and then at certain times during the day you could grab a seat and one at a time the ladies would hold up a quilt and tell the story behind it. They had quilts from all eras and it was great to see the history of the area sewn with love into these quilts. My Grandma Marilyn had actually worked on several of the quilts there. The biggest surprise was a community quilt that was about 50 years old.

Each square was hand embroidered by a member of the group and then it was all stitched together. Some of the ladies who worked on the quilt were in the audience.

One square caught our family's eye.


This square was made by my Great-Grandma Anna Dempster! Anna is my middle name (named for her of course!) and it was such a lovely way to witness crafting through the generations.

After this trip I have become obsessed with quilting. I went to the library and got a lot of books on the subject (when in doubt-go to the library) and I have been pouring over new found quilt blogs and posts all over the internet. I found Wild Olive's post to hit really close to home (and she includes some excellent links) and I also loved the Etsy's Blog post on the Aids Quilt. So inspiring! I have a hundred ideas for projects running through my head now but hopefully I will now have the motivation to finish that quilt I have started and then to start sharing some of my zany ideas.

Happy Stitching!


Thursday, June 28, 2012

Vintage Luggage Set

Do you remember that show Pan Am? Well it didn't do very well but it made a lot of people covet those super cute pan am bags.


Those super cute bags were also super expensive- at least for my shoestring crafty budget. Still it was what I really wanted to get for my friend Krista for her birthday. Thrifting to the the rescue! One day of visiting every thrift store in town uncovered these gems.


Then to personalize them even more I made a 'Pan Am' logo for the red bag. I took a picture of the logo from the internet and took out the name. Then I downloaded the same font and used that to put in her name "Krista". I played around with a couple different ways of getting the new logo on the bag but I ended up just tracing and painting it with some craft paint. To finish it off I tied vintage ladies ties to each bag.


And there  you have it a super cute personalized gift that cost way less than the store bought option. Plus we did some upcycling and made it 'handmade'. Epic win all around.


Anyone else make any cool gifts recently?

Cheers.