I had the good fortune of watching Agent Carter tonight! I don't think I am being too dramatic when I say that this is now my new favorite thing ever. Comic books, awesome heroine, and 40's amazingness? Yes Please! Seriously I just finished watching it on hulu about 20 minutes ago. The premier was last night and after a quick google search I found lots of reviews that were either positive, or saying something to the effect of the feminism was too heavy handed. To refrain from going on a rant/tangent on THAT topic lets focus on the important things here shall we? Like the fabulous vintageness of the ENTIRE show. Hair, makeup, shoes, stockings, cars, buildings, suits, ties, this show is a vintage lovers dream! One of the main reasons Captain America has been my favorite Avenger and Marvel movie so far is that it is set in the 40s. Can't gush enough. I would love to really delve in and talk costuming on this show. Are other vintage lovers thinking the same? I wonder if I will be able to find some like-minded bloggers out there on the case already.
Love love love!
What a bombshell! Did I mention that she had poison lipstick?! Where can I get me some of that?
Showing posts with label costume. Show all posts
Wednesday, January 7, 2015
Friday, November 9, 2012
Is it over?!
Not only is October (and Halloween) over we already solidly in November! Where has the time gone? I am going to say that I have been having so much fun that the time has just flown by...Mostly true! I did get a few Halloween projects done this year, including two costumes.
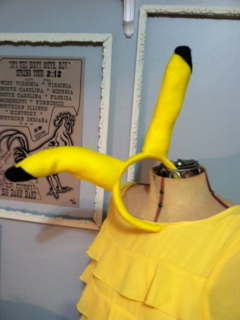
One was for my sister. She wanted a pikachu costume. I forbade her from buying one!
We headed to the thrift store and found an adorable yellow dress. I made a tail and some stripes and a set of ears.
For the ears I covered a headband and stuffed the ears with polyfil and some lightweight wire to give them a bit of bend.
The tail is a styrofoam base covered in fabric (all sewing- no glue!) The base of the tail is sewn to the dress and then a small loop of string was attached to the top of the tail and then looped onto the button at the top back of the dress to make the tail stand up.
The stripes are dark brown felt sewn to the dress. The upper stripe covered some of the zipper so it is only half sewn on and the other half I attached 3 velcro bits so you can still unzip the dress.
Some major blush on the cheeks and she was the cutest pokemon at the party. (Ok she was the ONLY pokemon at the party...but still!)
I also made a squirrel costume for my girl Squirrely Q. I had her buy a hoodie that she liked and I added ears and a tail. She loves it so much she still wears it around. I didn't get a picture of it but I also bought a small glitter acorn from the craft store and added a loop of fabric to it so she could wear it around her wrist or safety pin it to herself so she wouldn't lose it!
Hope everyone had a safe and happy Halloween and now onto the holiday season! WOOO HOOOO!
Wednesday, October 10, 2012
I Heart: Pattern Sales!!!!
Another pattern sale! How can I resist? Patterns that are $17.95 on sale for 99 cents!!!! Be still my heart. Now though I really do need to get a box for all of my patterns because I am beginning to forget which ones I already have. I think that means I need to start sewing! This time it was all costume patterns. They are my favorites and I was shopping with other people who didn't want to spend another hour at the store as I pour over the pattern books!
And yes- that pattern on top is CLEARLY a 'Snow White and the Huntsman' pattern. That is a movie I did not like AT ALL which was disappointing because I love Snow White stories. Anyways the outfit is so darn cute that I couldn't resist getting the pattern. I also just sort of love the patterns that come out for the movies that were released this year. Maybe I can use it for the Oscar party next year.
Now for the good part: Drumroll Please!!!!!
Cost: $102.70
On sale for: $6.38!!!!!
Savings of: $96.32
Boom. Happy Haunting! (And sewing!)
Tuesday, October 9, 2012
Harvest Moon Festival: Fall Floral Crown DIY
I helped out at the History Center's Harvest Moon Festival this weekend and we were encouraged to dress up so of course I jumped on it! I originally wanted to be sort of a fall/fairy queen type but I started to run out of time to get together an elaborate costume. This is a lesson that I have learned over and over and I really need to take it to heart: USE WHAT YOU HAVE. Sometimes I get so obsessesed with creating a new costume that I forget that I already probably have stuff in my closet and craft room that would work. I did really want to make a fall floral crown after being inspired by all the tutorials and things I have recently seen.
A trip to Michaels provided some lovely fake fall items on sale I got this whole bunch for less than $5! My job at the festival was helping out at the pumpking painting station so I wanted to make sure I had at least one pumpkin involved.
The rest of my costume ended up being a combination of a few different costumes I had and some regular clothes. It was supposed to be a bit like a victorian looking witch. One girl described me as a 'Fall queen' and said that I was 'very pretty and you have the perfect color hair." She might have been my favorite! It was a little chilly and of course I forgot my camera but here are the little pumpkins I painted!
Happy Haunting!!!
A trip to Michaels provided some lovely fake fall items on sale I got this whole bunch for less than $5! My job at the festival was helping out at the pumpking painting station so I wanted to make sure I had at least one pumpkin involved.
First: I simply unwrapped the small circle of leaves and beads. I was hoping to use this as a base. Lo and Behold! It was a perfect shape and size. I would probably wear this by itself it is so pretty.
2nd: I just started pulling apart elements from my other 'sprigs' and winding and twisting them into the base crown. In a couple spots I used brown twist ties to secure the items together. The whole project took less than 10 minutes! And since there was no glue involved I can take this apart to either source for other craft projects or to mix up this look. Win! Mine sat on my head just like a head band but if you added ribbon to each end you could tie it and adjust the side a bit for the kids in your life! (Just make sure they are old enough not to try and eat it- there are some small bits!)The rest of my costume ended up being a combination of a few different costumes I had and some regular clothes. It was supposed to be a bit like a victorian looking witch. One girl described me as a 'Fall queen' and said that I was 'very pretty and you have the perfect color hair." She might have been my favorite! It was a little chilly and of course I forgot my camera but here are the little pumpkins I painted!
Happy Haunting!!!
Thursday, July 5, 2012
Poison Ivy Cupcakes
Even though the weather has been sweltering lately I have been doing more baking than I have in a long time! My fishing themed cupcakes for my friend's bridal shower turned out cute...but I forgot my camera so I am waiting for my other friend to upload her pics from her camera (which she is notoriously slow at : ).
This week though one of my derby gals was in need of some cupcakes to go with her Poison Ivy costume. I jumped on that task! I knew what I wanted them to look like in my head and I think they turned out rather well. Nice bright red and green (it looked like Christmas threw up in my kitchen because I am a messy decorator!) in two flavors: Red Velvet and white. I threw in some green into the white batter to continue the theme.
All boxed up and ready to go! She really liked them but I am still waiting to hear if they were a hit at her event!
It might not have been one of the better Batman movies (understatement of the year) but I really loved Uma Thurman as Poison Ivy. She totally rocked it and looked like she was having an absolute blast!
Thursday, March 29, 2012
Costume: Emma Frost
Even though it has been awhile since the Oscars I wanted to share a little bit about how my Emma Frost costume came together. I went back and forth for quite awhile on what character to choose for this years Oscar Costume Party. It was seriously the day of that I got the final pieces together. This year was tricky for choosing a great female character. My back up plan was to slap on my hot pink bridesmaid dress and call it good. (I have gotten a lot of use out of that dress! Thanks Sarah!) But finally I settled on Emma Frost from X-Men: First Class. I really loved that movie (Michael Fassbender!!! Drool.) I decided to go with Emma for the fun costume possibilities and not so much the love for the character or 'acting'. Sorry January Jones but your body is rocking but your acting just never really does it for me. I look nothing like Miss Jones so I was not going to go for the bra and mini look that she rocks for most of the movie.
I found the dress last minute at a thrift store. Pulled on some knee high socks for the 'sixties look' and rocked my sparkly heels. My sister (pictured above as Lisbeth Salander from The Girl with the Dragon Tattoo) let me borrow this blond curly wig. I brushed out the wig a bit and focused most of my attention on the make up.
I wanted to go for a 'changing into diamond form' look and was completely inspired by this Mermaid Makeup tutorial from Etsy.
In the tutorial she uses spirit gum to attach iridescent sequins to her face to create a bubbly look. I took that idea but used shiny silver sequins from the craft store. I bought the spirit gum at my local party store that carries a bunch of Halloween type makeup all year long. I started with my hairline (before putting on the wig) and layered in towards my face, keeping it thicker towards the outside and thinning it out as it went in. I also applied a lot of sequins to my chest/neck and a few on my arms as well. I felt a bit like a walking disco ball but I think it turned out pretty well. I bought some loose body glitter from Wal-Mart to amp up the sparkle around my eyes and I just applied generously all over. I finished the look with glitter nail polish. The wig ended up covering up quite a bit of the sequins on the face.
I felt pretty sparkly, and a little over-dressed but it was all good friends there so I didn't really care that much. By the end of the night I had taken off the wig and started peeling sequins off. Also I didn't spill anything on the white dress! WIN!!!
Wednesday, March 28, 2012
Blog Catch Up- Oscar Party
Well March is almost over and I am just now getting around to posting about the Oscars. Oh well! Anyway I wanted to share the few pictures I took during the evening. The one rule for the party was to dress up as a character from a movie in the past year. It did not have to be a character from an Oscar nominated film.
Here we have not one but TWO Megans from Bridesmaids and a Brad Pitt from Moneyball.
This is Mr. Popper sans penguin. The penguin is around there somewhere.
Then we have Hayley Atwell from Captain America and Skeeter from The Help.
Sisters! Emma frost from Xmen: First Class and the Girl with the Dragon Tattoo from...well you get that one.
Last minute guest. No costume but she practiced her Oscar acceptance speech with a mini-oscar cupcake complete with the ugly cry so we let it slide.
The gypsy in the corner is from the new Sherlock Holmes movie.
Overall a fun night. I of course was so wishy washy about my costume until about the DAY of but tomorrow I will share how my Emma Frost costume came together.
Saturday, January 21, 2012
The Lion King
I had not been to the theater in quite a long time but last night that pattern was broken with a trip to the Twin Cities to see 'The Lion King'. I was excited about this trip for awhile but I think I forgot how amazing it was supposed to be because when the circle of life started up and those AMAZING costumed/puppeted animals came out on stage I started to tear up. Yep. I cried at the costume design. It was just so perfect. Plus that is totally my kind of theater, spectacle. I like a big show.
This is just an example of the costumes. My favorites were the giraffes.
Since I can't help myself I had to dress with a bit of theme.
I kept it fairly simple with these earrings. Aren't they darling? They remind me of vintage animal jewelry. I snagged them for $3 about a month ago and waited to debut them until last night. My friends were mostly lucky that I decided not to wear my full length faux-leopard coat. : )Tuesday, November 8, 2011
Harry Potter Crafts
Trying to do a bit of cleanup today around the house...no I haven't moved yet and it looks as though the snow is going to beat me. Oh well, it will get figured out! I wanted to share a few 'before' shots for you today with the Harry Potter crafts I did for the party the other day.
Also this is all evidence that you can do some really cool things with little to no money. Work with what you have, be creative and have fun with it!
First up: Wands! The party was supposed to be BYOW (Bring your own wand) but being the nerd that I am I decided to make some after finding a super cool tutorial online. Sticks from the yard plus hot glue and paint that I already had= the most awesome Harry Potter wands ever! They seriously rivaled the one 'real wand' from Harry Potter World. Cost: $0
At the party it was taped right to the door so when guests entered the party they had to 'go through it'. Project cost: $3
Of course I needed a sign for platform 9 3/4 ! Some people would say I am a hoarder..but I say I am useful. I rummaged around the garage again and found these old cabinet doors from when our kitchen was redone years ago. These have come in handy in many a craft project! I busted out a drill and put two small holes in the 'upper' corners to hang it from.
Then I busted out some red spray paint I already had and gave it a coat front and back. I traced a plate to get the circle and free handed the lettering and numbers (sketched it out a bit in pencil first). All the paint I already had and then We just used some cord I had to string it up. It looked pretty cool lit by the outdoor light as guests arrived. Project cost: $0
For my Bellatrix costume I had this black costume-y 'basic' shift in my costume closet. I first cut the sleeves off and then 'sewed' them back on with a thick black cord. It was a bit skinny towards the bottom so I slit up the sides to the hips, layered it over a black poofy prom dress and then used my mock black corset I made for the cemetery walk and layered that on top. I also added some gold paint swirls to the shift around the neckline and on the sleeves. I don't have a good 'after' shot but for no money it was a pretty sweet costume. Costume cost: $0
The day of we were still crafting, decorating, and cooking like mad. The birthday girl was going as Hermione and wanted a time turner. She is holding it in this picture. The hourglass is two mini bottles filled with a bit of salt and hot glued shut. Then we found two craft frames (the little plastic kind for needlework) so I hot glued those back to back and then built up some hot glue to put the hourglass. Once it set up I painted the glue with a bit of gold paint so it gave it a little shimmer and didn't look so much like glue! Found an old vintage chain in my jewelry making box and done! Might be my favorite craft of the day because it came together really randomly just grabbing things from around my craft room. Cost: $0!
Also this is all evidence that you can do some really cool things with little to no money. Work with what you have, be creative and have fun with it!
First up: Wands! The party was supposed to be BYOW (Bring your own wand) but being the nerd that I am I decided to make some after finding a super cool tutorial online. Sticks from the yard plus hot glue and paint that I already had= the most awesome Harry Potter wands ever! They seriously rivaled the one 'real wand' from Harry Potter World. Cost: $0
While google-ing 'Harry Potter Parties' I found lots of kids parties. Go figure. But an idea I did really like was the platform 9 3/4 bit. So I went to a fabric store and found this in the remnant bin.
Tip- don't try to paint straight lines on grass! Dumb idea...I moved to some concrete to get the job done. I had to bust out one of those little knee saver pads to work on this project but it was worth it.
I used a board in my garage to make the horizontal lines. I poured out a TON of paint...you actually don't need very much at all. To make the 'bricks' I found a smaller board about the right size and just staggered the bricks. At the party it was taped right to the door so when guests entered the party they had to 'go through it'. Project cost: $3
Of course I needed a sign for platform 9 3/4 ! Some people would say I am a hoarder..but I say I am useful. I rummaged around the garage again and found these old cabinet doors from when our kitchen was redone years ago. These have come in handy in many a craft project! I busted out a drill and put two small holes in the 'upper' corners to hang it from.
Then I busted out some red spray paint I already had and gave it a coat front and back. I traced a plate to get the circle and free handed the lettering and numbers (sketched it out a bit in pencil first). All the paint I already had and then We just used some cord I had to string it up. It looked pretty cool lit by the outdoor light as guests arrived. Project cost: $0
For my Bellatrix costume I had this black costume-y 'basic' shift in my costume closet. I first cut the sleeves off and then 'sewed' them back on with a thick black cord. It was a bit skinny towards the bottom so I slit up the sides to the hips, layered it over a black poofy prom dress and then used my mock black corset I made for the cemetery walk and layered that on top. I also added some gold paint swirls to the shift around the neckline and on the sleeves. I don't have a good 'after' shot but for no money it was a pretty sweet costume. Costume cost: $0
The day of we were still crafting, decorating, and cooking like mad. The birthday girl was going as Hermione and wanted a time turner. She is holding it in this picture. The hourglass is two mini bottles filled with a bit of salt and hot glued shut. Then we found two craft frames (the little plastic kind for needlework) so I hot glued those back to back and then built up some hot glue to put the hourglass. Once it set up I painted the glue with a bit of gold paint so it gave it a little shimmer and didn't look so much like glue! Found an old vintage chain in my jewelry making box and done! Might be my favorite craft of the day because it came together really randomly just grabbing things from around my craft room. Cost: $0!
Sunday, October 30, 2011
A Very Haunted Harry Potter Birthday Party
It was a lot of work and we were scrambling at the end a bit but the party came together rather nicely and was a SUPER GOOD TIME. Probably the best 'Halloween Saturday' (as I like to call it) in quite a long time. I just can't help imagining what I could do with more time and money!
Cauldron cakes, licorice wands, Bertie Bott's every flavored beans, and dips, chips, and other goodies.
Happy Haunting!
Cauldron cakes, licorice wands, Bertie Bott's every flavored beans, and dips, chips, and other goodies.
The Three Broomsticks
Butterbeer!
Group shot (thanks to Muggle camera woman Miranda)
Fluffy
Doby the house elf
Time turner!
![]() |
Ron
Hermione
Dolores Umbridge
Trelawney
Harry Potter
Professor McGonagall
Trelawney (less unhinged)
The birthday kids. Hahahahahaa. I love this picture! I will write another post and go into some of the crafty details in a different post. But for now I wish you a good nights rest before All Hallows Eve.Happy Haunting!
Subscribe to:
Posts (Atom)